Introduction
The capacity to produce bootable media is a crucial skill in the current computer environment. An adaptable tool that enables you to install or repair operating systems, do diagnostics, and even recover data is a bootable Pendrive, commonly called a bootable USB drive. This in-depth tutorial will show you how to make a bootable pen drive using the Command Prompt (CMD), paying close attention to each step to guarantee your success.
Understanding the Importance of a Bootable Pendrive
A portable option for diverse computer demands is a bootable pen drive. Having a bootable USB stick may save you time and effort whether you’re a computer enthusiast, a system administrator, or someone trying to debug your computer. It is an essential tool for experts and regular users since it enables you to execute programs straight from the pen drive and circumvent the operating system on the host machine.
What is a bootable pen drive?
A bootable USB flash drive is a portable storage device that has been set up to hold an operating system or a bootable utility. This enables a computer to start up or boot from the contents of the USB drive rather than its internal hard drive.
Formatting the USB drive in a specified method and transferring the required files from an installation disc or an operating system image file are two steps in the process of making a bootable USB drive. When doing operations like installing a new operating system, diagnosing system problems, or running diagnostic tools, this makes it possible for the computer to load and execute the operating system straight from the USB drive.
You normally need to open the computer’s BIOS or UEFI settings and designate the USB drive as the primary boot device in order to utilise a bootable USB drive. The boot procedure will begin when the machine first turns on by scanning the USB device for bootable files.
how to make bootable pen drive using cmd – video tutorial for you
How to make a bootable pen drive is frequently used for many different things, such as:
Operating System Installation: To install a new operating system on a computer, use a bootable USB device.
System recovery and Troubleshooting: tools can be found on bootable USB devices, which can be used to troubleshoot and fix system problems.
Data Rescue: In the event of a system crash, essential files can be recovered from a broken system using a bootable USB drive with data recovery software.
Password recovery: You may reset or retrieve user account passwords on a computer using bootable USB sticks.
Benchmarking and Testing: In addition to software for running benchmarking programs, bootable USB devices may also contain software for testing hardware components.
Typically, to make a USB drive bootable, the required boot files must be copied onto the USB drive using specialised software or built-in utilities offered by the operating system. Depending on the operating system you wish to make bootable and the tools you employ for the job, the precise stages may change.
Can we use a bootable pen drive as a normal pen drive?
Yes, even if a USB flash drive has been configured to be bootable, you may still use it as a regular pen drive for file storage and transmission. You may still use the disc as a standard storage device despite the bootable feature.
However, there are a few things to keep in mind:
File Compatibility: When you make a USB drive that can be booted, you format it with a certain file system that works with the bootable data. The kinds of data you may store on the device can be restricted as a result. For instance, the USB drive could be formatted with a Linux-compatible file system like ext4, which may not be natively accessible by Windows without extra software, if you’ve configured the USB drive with a bootable Linux distribution.
Storage Space: The size of the bootable material you’ve included will affect how much storage space is left on the bootable USB device. Therefore, the amount of space that may be used to store ordinary files may be smaller than the drive’s entire storage capacity.
Data Loss Risk: You must be cautious not to unintentionally remove or replace the bootable material when using the bootable USB drive as a regular storage device. The disc could become unbootable if important files are deleted or formatted.
Virus Scanning: The bootable USB drive may come into contact with viruses if you use it on several different computers. To avoid transmitting viruses and other dangerous stuff to other systems, it’s a good idea to frequently scan the disc for them.
Organization: Keeping your bootable and non-bootable stuff separated on the disc is a smart idea. To prevent confusion, you can think about making distinct folders for each category of information.
In conclusion, the answer is that you may use a bootable pen drive just like a regular pen drive for transferring and storing files. Just be mindful of the potential restrictions and take safety measures to prevent unintentionally changing the bootable content or posing security issues.
What is the difference between a bootable pen drive and a normal pen drive?
A bootable pen drive and a standard pen drive, often known as a typical USB flash drive, have various functions and traits:
-
Bootable Pen Drive:
Purpose: An operating system or bootable utility is particularly developed for a bootable pen drive, enabling a computer to start up or boot from the contents of the USB drive. It is utilised to set up or execute an operating system, resolve system-related problems, or carry out other system-related operations.
Content: It contains items like boot loaders, system files, and installation/setup programs that are required to boot an operating system or utility.
Formatting: Typically, it is formatted with a certain file system that is compatible with the booting operating system or utility, such as FAT32, NTFS, or ext4.
Size: The capacity of the disc that is accessible for ordinary files might be severely constrained by the size of the bootable material.
2. Normal Pen Drive (Regular USB Flash Drive):
Purpose: A common USB storage device known as a pen drive is used to store and transport data such as files, documents, media, and other types of information. It is not designed to be used to start a computer and lacks any unique bootable material.
Content: It has the capacity to hold a variety of things, including text documents, images, videos, music, and other kinds of information.
Formatting: It is commonly formatted using a file system like FAT32 or exFAT, which offers interoperability with many operating systems.
Size: The drive’s complete storage capacity is available for use in storing files.
Key Differences:
Functionality: The primary distinction is that a bootable pen drive is made to start a computer and execute an operating system or programme, whilst a regular pen drive is made to store and transmit data.
Content: While regular pen drives include a range of user-generated data, bootable pen drives feature specialised boot files and operating system files.
Formatting: While regular pen drives frequently employ file systems compatible with numerous platforms, bootable pen drives may use file systems optimised for the operating system being booted.
Usage: While regular pen drives are used for daily data storing and sharing, bootable pen drives are utilised for system installs, recoveries, and troubleshooting.
In conclusion, a bootable pen drive is designed particularly to allow a computer to boot into an operating system or application, whereas a standard pen drive serves as a general-purpose file storage device.
how to make bootable pen drive using cmd – step by step
Step 1: Compile Your Resources
Before you begin, ensure you have the following:
- A USB pen drive with enough storage (it’s advised to have at least 8GB).
- A bootable ISO image of the operating system you choose. This is available for download from reputable sources or the operating system’s official website.
Step 2: Get the Pendrive Ready
- Put the USB pen drive in a computer port that is accessible for USB devices.
- As the process involves formatting the pen drive, be sure there are no important files on it.
Step 3: Launch a Command Prompt window with administrative rights.
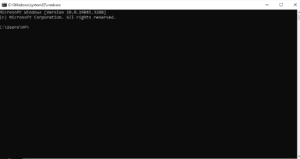
In order to launch the Command Prompt with administrator rights, press Win + X and choose “Command Prompt (Admin)”. For low-level operations like formatting the pen drive, this is crucial.
Step 4: Find the Command Prompt by navigating there
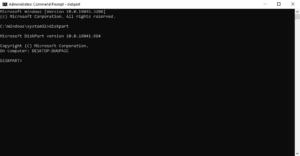
Type diskpart into the Command Prompt window and hit Enter. The DiskPart tool will launch as a result.
Step 5: List Available Disks
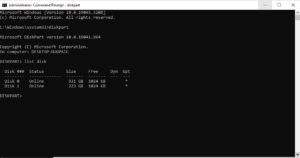
Enter the command “list disk” into the DiskPart utility. A list of your computer’s accessible discs will be shown when you use this program.
Step 6: Select Your Pen drive
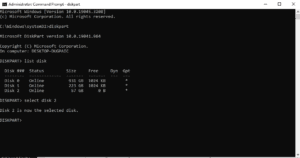
Based on its size, choose your USB pen drive from the list of disks. Keep in mind the disc number that corresponds to your Pendrive.
Step 7: Clean the Pen drive
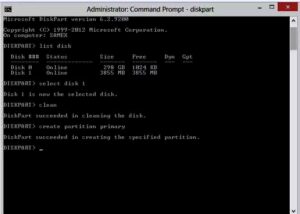
Enter the command and choose “disk X” (replace X with the disk number on your Pendrive). Clean, then hit Enter. All of the pen drive’s partitions will be deleted with this operation.
Step 8: Create a Bootable Partition
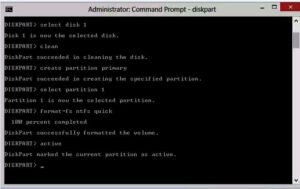
Enter the command “create partition primary”. On the pen drive, this operation will make a brand-new main partition.
Step 9: Format the Partition

This command will format the partition using the NTFS file system. Type format “fs=ntfs” fast and hit Enter.
Step 10: Set the Partition as Active
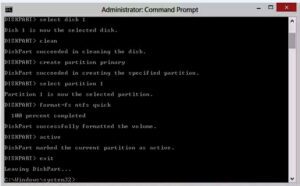
Enter the word “active”. By designating the current partition as active, you may now boot from it.
Step 11: Assign a Drive Letter
Specify assign, then hit Enter. This command will give the partition a drive letter.
Step 12: Copy Operating System Files
- Navigate to the ISO images and the mounted pen drive’s locations in File Explorer.
- All files should be copied to the pen drive from the ISO image.
Step 13: Safely Eject the Pendrive

- Before returning to the Command Prompt, close any open windows.
- To close the DiskPart utility, enter exit and hit Enter.
- Remove the pen drive from your computer safely.
Conclusion
You’ve successfully used the Command Prompt to build a bootable pen drive. From OS installation to system recovery, this strong programme may save you in a variety of circumstances. You have given yourself a useful skill that can improve your computer experience and problem-solving skills by carefully following this comprehensive tutorial. Don’t be afraid to construct many bootable pen drives for various operating systems or reasons since, as they say, practice makes perfect. In this tutorial, we looked at how to use CMD to create a bootable pendrive step-by-step. This technique gives you the ability to always have a dependable answer available whether you need to install or fix operating systems, conduct diagnostics, or carry out data recovery procedures.
how to make a bootable pen drive using cmd-simple step
1.diskpart
2. List disk
3. select Disk x (pen drive)
4. Clean
5. Create partition primary
6. select partition x(pen drive)
7. format = fs ntfs quick
8. active
9. Assign a Drive Letter
10. Exit
